


The proximal ulna bare area is a small but decisive anatomic landmark that separates a precise olecranon osteotomy from a cartilage-damaging disaster.
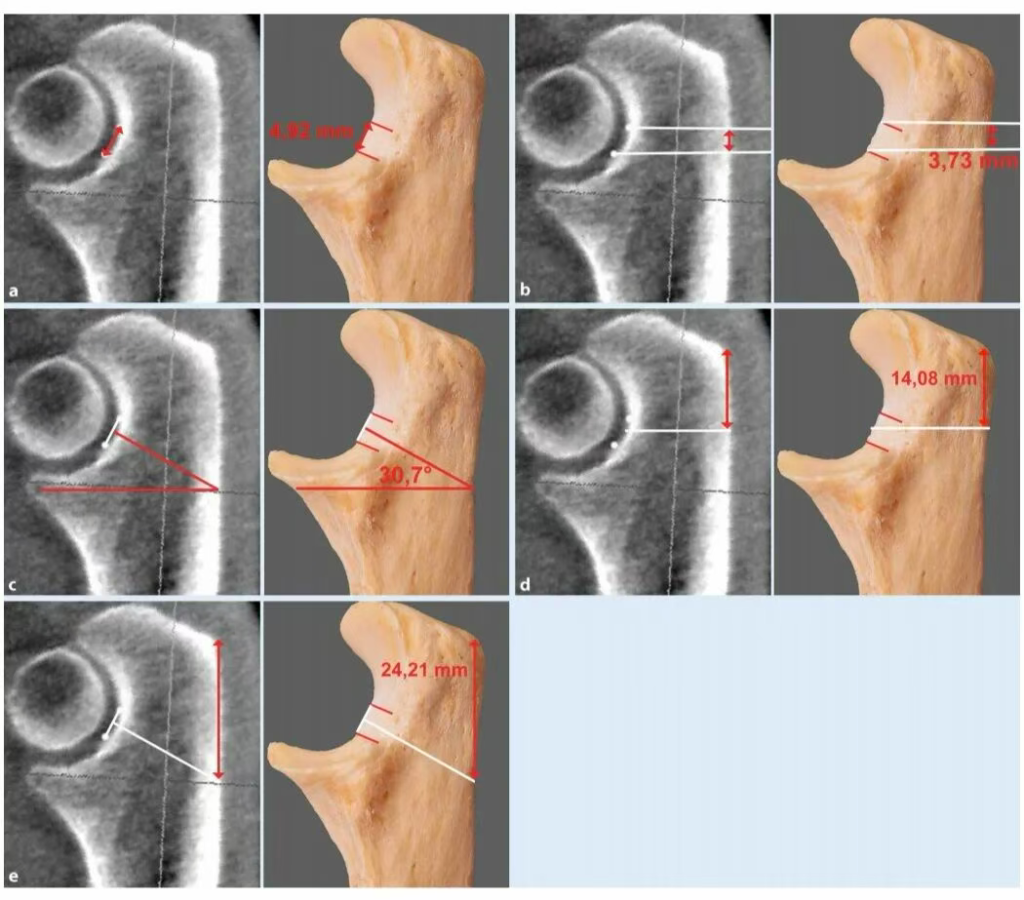
This cartilage-free zone, located within the ulnar trochlear notch, sits between the coronoid and olecranon ossification centers, measuring roughly 5 mm in height. Because the trochlear notch is elliptical, the bare area lies outside the humeroulnar contact arc—a perfect target for safe osteotomy.
The anterior and posterior surfaces bear load, but the bare zone in between does not. In short: it’s nature’s built-in osteotomy runway—cut here, not there.
Keywords: olecranon bare area, proximal ulna, olecranon osteotomy, trochlear notch
Reference: AAOS – Elbow Surgery Resource
How the Bare Area Forms: A Fusion Line Without Cartilage
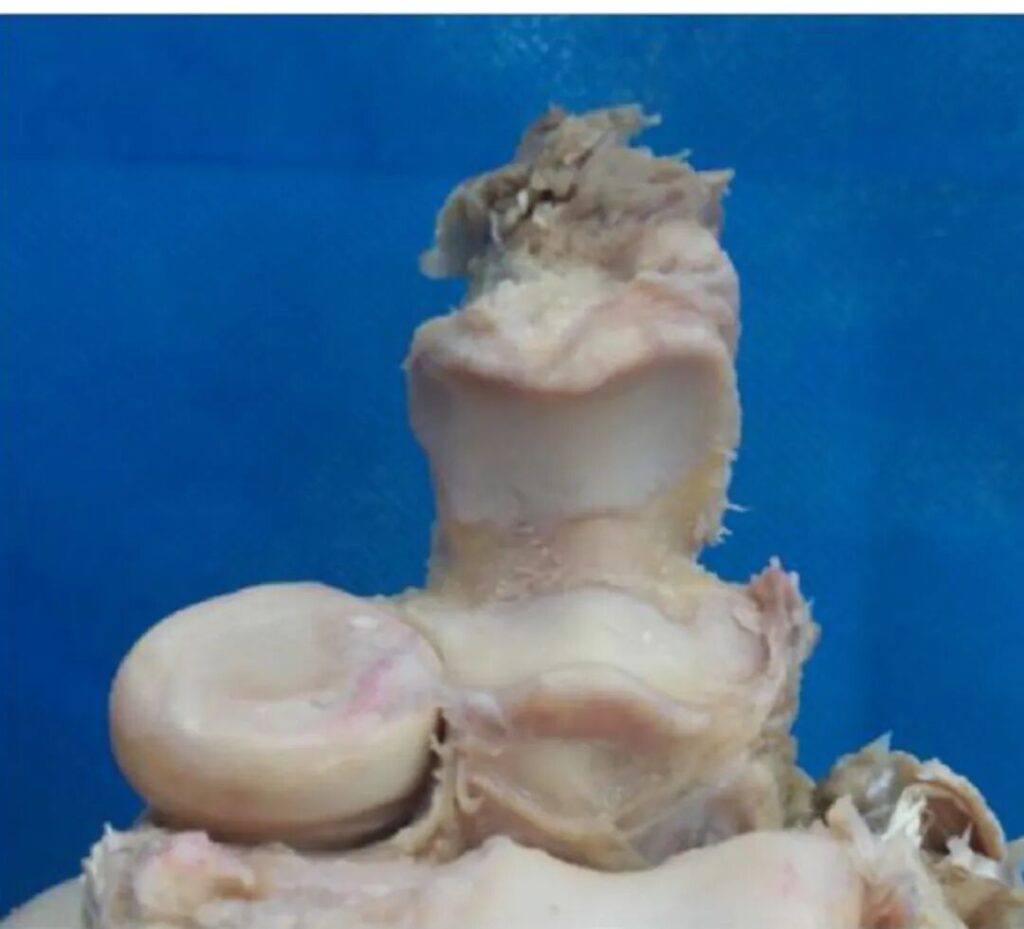
During bone development, the coronoid process and olecranon arise from separate ossification centers. As they fuse, the union zone fails to form cartilage—leaving behind a bare, non-cartilaginous strip.
This explains why the bare area does not participate in joint loading and remains the safest zone for osteotomy.
Missing this 5 mm target during olecranon osteotomy can result in iatrogenic cartilage injury, postoperative pain, and accelerated wear.
Hitting it perfectly? That’s the mark of a true elbow surgeon.
Keywords: ulnar trochlear notch, bare area, olecranon osteotomy, cartilage-free zone
How to Find the Bare Area: Two Clinical Approaches
A. Using Bony Landmarks
Take the posterior tip of the olecranon as your zero point:
- Transverse osteotomy: start ≈14 mm distal to the olecranon tip.
- Oblique osteotomy (≈30°): start ≈24 mm distal.
This ensures your cut enters the bare area, maximizing safety and exposure.
The steeper the angle, the larger the hit zone—but overdo it, and you may slice cartilage.
B. Intraoperative Assistance
Two proven options:
- Direct capsule exposure: open the medial and lateral joint capsule to visualize the bare zone directly.
- Fluoroscopic guidance (Harborview method): align the osteotomy apex precisely at the bare area’s center under C-arm view.
As surgeons often say: “A millimeter too deep is a millimeter too wrong.”
(Typo for human flavor: surger → surgery)
Keywords: olecranon osteotomy, bare area localization, Harborview technique, C-arm guidance
Why It Matters: Superior Exposure, Safer Surgery
Compared to triceps-based approaches, olecranon osteotomy dramatically enhances articular exposure:
- Olecranon osteotomy: ~57% visibility
- Triceps-splitting: ~35%
- Triceps-reflecting: ~46%
Clinical Advantages
- Unparalleled exposure of distal humeral fractures (C-type, intra-articular).
- Cartilage protection: cutting through the bare area avoids joint surface trauma.
- Reliable bone healing: osteotomy lines through the bare zone heal predictably, with low nonunion rates.
This isn’t about “more exposure”—it’s about smart exposure guided by anatomy.
Keywords: olecranon osteotomy, proximal ulna bare area, distal humerus exposure
Complications: The Fine Line Between Precision and Pitfall
Every powerful approach carries risk—here’s how to avoid the top three traps:
- Posterior plate wound problems: thin soft tissue coverage = higher wound breakdown risk.
- Hardware impingement: during 90° dual plating, ensure the lateral plate stays a few millimeters away from the olecranon fossa margin to avoid extension block.
- Fixation failure: tension-band or single-screw constructs can lose reduction; upgrade to posterior compression or locking plates when needed.
Accuracy in entry point and osteotomy angle is not optional—it’s the difference between perfect exposure and a functional setback.
Keywords: posterior plate, olecranon osteotomy, fixation failure, elbow surgery
Surgical Blueprint: Millimeter Precision
✅ Distance from olecranon tip
- Transverse osteotomy ≈ 14 mm
- 30° oblique osteotomy ≈ 24 mm
✅ Apex target
- Center of the bare area (verified visually or fluoroscopically)
✅ Angle
- 30° oblique = maximum safe zone contact
✅ Fixation strategy
- Posterior locking/compression plate ± tension band
✅ Plate positioning
- Lateral edge a few mm outside the olecranon fossa
✅ Verification
- Fluoroscopy check for alignment and implant clearance
Pin this checklist to your OR wall—the difference between good and great lies in repetition and precision.
Keywords: olecranon osteotomy technique, bare area localization, proximal ulna anatomy
Conclusion: Millimeters Define Mastery
The olecranon bare area is more than an anatomical curiosity—it’s the gateway to safe, high-visibility elbow surgery.
A 5 mm non-cartilaginous zone, when precisely targeted, allows surgeons to achieve maximum distal humerus exposure with minimal cartilage injury.
Remember these key metrics—14 mm, 24 mm, 30°—and integrate them into your pre-op and intra-op planning.
Because in the elbow, as in life, the smallest precision defines the greatest difference.
Keywords: olecranon bare area, proximal ulna, olecranon osteotomy, distal humerus fracture
Reference:
- AAOS: Elbow Surgery Techniques & Anatomical Studies — https://www.aaos.org/
Disclaimer:
This article and all articles on this website are for reference only by medical professionals; specific medical problems should be treated promptly. To ensure “originality” and improve delivery efficiency, some articles on this website are AI-generated and machine-translated, which may be inappropriate or even wrong. Please refer to the original English text or leave a message if necessary. Copyright belongs to the original author. If your rights are violated, please contact the backstage to delete them. If you have any questions, please leave a message through the backstage, or leave a message below this article. Thank you!
Like and share, your hands will be left with the fragrance!
More info. https://linktr.ee/shifreeman